WooCommerce Payments provides your store with:
- A payment gateway to accept credit and debit cards directly onsite; and
- A dashboard for managing transactions, including payments, refunds, disputes and deposits, integrated into your site’s WordPress administration area.
WooCommerce Payments is currently available only to merchants based in a supported country and selling in a supported currency.
Requirements #
- Business based in a supported country.
- PHP 7.0+
- WordPress 5.7+
- WooCommerce 4.8+
- An SSL certificate to use the payment gateway in live mode
Installation #
To install WooCommerce Payments:
- Go to Plugins > Add New on your WordPress site.
- Click the Upload Plugin button at the top of the screen.
- Select the woocommerce-payments.zip file from your local filesystem.
- Click the Install Now button.
- When installation is complete, you’ll see “Plugin installed successfully.”
- Click the Activate Plugin button at the bottom of the page.
To learn more about installing plugins from a Zip file, see Installing and Managing Plugins.
Get Started #
After installing the plugin, to begin using WooCommerce Payments, you need to:
- Follow the prompts to connect to a WordPress.com account.
- Verify your business details with our payments partner Stripe.
To complete the verification process:
- Go to Payments.
- Click Set up.
- Fill in all verification form fields.
Once you have completed the verification with Stripe, your site will be ready to accept credit and debit card payments onsite.

Manage transactions #
Many different types of transactions can occur with your store via WooCommerce Payments, including:
- Deposit: Transfer of all or part of your account balance to your bank account or debit card.
- Charge: A payment charged against a credit or debit card for a purchase.
- Refund: Return of all or part of a charge to the card a customer used to pay for a purchase.
- Dispute: Chargeback or inquiry lodged by a customer with their card provider over a charge placed with your store.
- Dispute Reversal: Return of the fees and payment amount withdrawn after a dispute was opened.
With WooCommerce Payments, you can view and manage each of these different types of transactions within your WordPress dashboard.
Deposits
Deposits occur when a portion of your account balance is paid to your nominated bank account or debit card. Deposits are scheduled to transfer automatically to your deposit account. Eligible merchants can also request an instant deposit.
WooCommerce Payments provides a list view and detail view of these deposits.
To access deposits, go to Payments > Deposits.
On this page, you can:
- View estimated deposits details.
- View the list of previous deposits.
- View the transactions associated with given deposit.
If your account balance ever becomes negative, then a Withdrawal transaction type will be displayed on this screen. Withdrawals represent a debit from your bank account to cover the negative balance.

Transactions
WooCommerce Payments provides a list view to access the information about all transactions on your site. This page includes transactions including the capture of a charge, payment, payment failure refund, refund, refund failure, dispute, and dispute reversal.
To access the transactions list view, go to Payments > Transactions.
On this page, you can:
- View the list of previous transactions.
- Sort the list by date, amount, fees and net revenue.
- Filter the list by date and type.
- View the details of a specific transaction.
If the payment is only authorized and not charged, those transactions will not show on this page. You can either manually capture the charge or in the case of an expired authorization, the customer will get the refund in the form of a reversal. For further details get in touch with a Happiness Engineer via the WooCommerce.com Support page.
Downloading Transactions
On the transactions screen, you can download your transactions via the download button. If all of your transactions are visible in the list view (maximum of 100), your export file will download immediately. Otherwise, an export file will be emailed to you. This is sent to the email address on your WordPress.com account. This may be different from you WooCommerce.com email address, your site’s admin user email address, the email address on your account with the site, and the email address on the WooCommerce Payments account.
Note: there are minor differences between immediate and emailed exports. For example, the emailed export will not contain order IDs, but will contain transaction IDs.
Disputes
A dispute is a chargeback or inquiry from a card issuer about a charge. Disputes occur when your customer questions a transaction with their card issuer.
You can view and respond to a dispute, and potentially overturn it, from within WooCommerce Payments.
To view the disputes, go to Payments > Disputes.
On this page, you can:
- View the list of disputes made on payments processed with WooCommerce Payments.
- View the status and other details of a specific dispute.
- Respond to a dispute while it has the status Needs response, by choosing to either:
- Accept the Dispute, and charge associated with it; or
- Challenge the Dispute, by submitting evidence required to overturn it.
Learn more about challenging disputes, and evidence required to overturn different types of disputes, in the dispute response guide.

Refund a payment
If a customer contacts you to request a refund, and your refund policy permits it, you can refund the payment from within your WordPress administration dashboard.
To refund a payment:
- Go to WooCommerce > Order.
- Search for the customer by email or name.
- Click the order ID & customer name.
- Click Refund.
- Adjust the quantity of the product(s) to be refunded, or type in the amount to be refunded in the Total column next to it.
- Optionally, enter a Reason for refund.
- Click Refund via WooCommerce Payments.
The charge amount plus transaction fees will be deducted from your account balance and returned to the customer’s original payment method.

Refund durations
Refunds are processed immediately, however, depending on the customer’s bank, it can take anywhere from 5 to 10 business days before it reflects on the customer’s statement.
In some cases, often when the payment is closely followed by a refund, the refund might be processed as a reversal. In this scenario, the original payment disappears from the customer’s account statement entirely and the balance reflects as though the charge never occurred.
If your customer doesn’t see the refund after 10 business days and the original charge is still visible on their bank statement, they should contact their bank for more information.
If further difficulties with processing the refund are encountered beyond this timeframe, please contact support.
Manually capture an authorized charge
If Issue an authorization on checkout, and capture later is enabled in the Transaction preferences, you will need to manually capture charges authorized on checkout.
To manually capture an authorized charge:
- Go to WooCommerce > Orders and find the order associated with the charge
- Click Choose an action…
- Click Capture charge
- Click Update
Importantly, you need to capture funds manually within 7 days of the order being placed, otherwise the authorization will be canceled alongside the order.

Settings #
To change your store’s configuration:
- Go to: Payments > Settings
- Adjust settings
- Click Save changes
Each setting available on this screen is explained in more detail below.

General
Enable WooCommerce Payments
Disable WooCommerce Payments to stop accepting credit cards on checkout using this payment gateway. You will continue to be able to access the Deposits, Transactions and Disputes administration screens after WooCommerce Payments is disabled.
Test mode
To test payments or disputes, you need to switch WooCommerce Payments into Test Mode. To view previously processed test transactions, you also need to enable Test Mode.
Test mode allows you to simulate transactions using test card numbers. It ensures your checkout is working and enables view-as-customer without placing a real order. Test mode only works with test credit card numbers.
Disable test mode to accept payments via real credit cards.
Express checkouts
Enable express checkouts
Want to sell with Apple Pay? Learn how to start accepting Apple Pay with WooCommerce Payments.
Enable express checkouts if you would like your customers to checkout via Google Pay or Apple Pay.
Show express checkouts on
This section controls where express checkouts is available. For example, by checking “Checkout”, “Product page” and “Cart”, shoppers can use express checkout on the checkout page, the product page, and the cart page.
Customize appearance
WooCommerce Payments supports a few options for you to customize your express checkout button.

Do note, there are two styles of buttons you might see depending on if you a) allow third-party cookies for the site you’re visiting, and b) have the “Share that you have Google Pay with companies outside Google” setting enabled in Google Pay itself.
If both a) and b) are true, the button is styled like this:

Otherwise, the button is styled like this:

Transactions and deposits
Transaction preferences
By default, payments will be charged at the time of checkout.
Enable Issue an authorization on checkout, and capture later if you would prefer to authorize payments on checkout and manually capture the charge later (e.g., on shipment).
Importantly, you need to capture funds manually within 7 days of the order being placed, otherwise the authorization will be canceled alongside the order.
Customer bank statement
Customer banks statements explain charges or payments on bank statements and include information that banks and card networks require to help customers understand their statements. Familiarize yourself with the requirements and recommendations for statement descriptors.
Use this field to set the name of the store to be displayed on the customer’s credit or debit card bank statement. By default the site URL specified during onboarding is used.
Updating bank account information
Your WooCommerce Payments account information is securely stored and managed with our partner, Stripe. Once you have completed account set up, WooCommerce Payments provides a link to access the Stripe dashboard through which you can view and update the following business information:
- The operating name of your company or Doing business as name
- Physical address
- Phone number
- Website
- Industry your business operates in
- Ownership information, including adding or removing owners, and beneficiaries
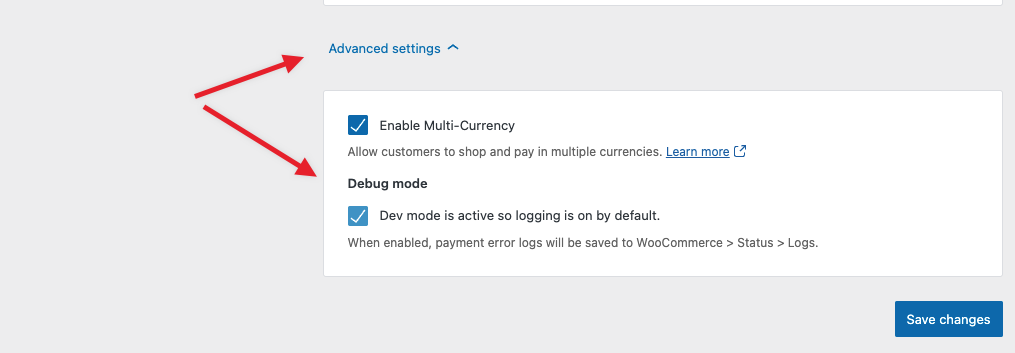
Advanced settings
Debug mode
If you are having issues processing payments or viewing dashboard screens, enable the debug log to record information about these events. To enable the debug log, go to Payments > Settings > Advanced settings:
Debug logs can be found in the WooCommerce > Status > Logs section of your dashboard. To view the logs:
- Go to WooCommerce > Status
- Click on the Logs tab
- From the drop-down, choose the log starting with
woocommerce-paymentsand ending with the date you wish to view

Multi-Currency
WooCommerce Payments allow merchants to set up their store to receive payments in one of many currencies, giving the shopper a list of currencies to choose from. The functionality is enabled as part of WooCommerce Payments. You should see the Multi-Currency tab after visiting Payments > Settings.

To learn about its options and how to configure them for your store, read over the Multi-Currency with WooCommerce Payments guide.
Subscriptions #
Unlike other WooCommerce payment gateways, which require the use of the WooCommerce Subscriptions extension to sell subscriptions, WooCommerce Payments both supports that extension and includes built-in subscription functionality.
That means when using WooCommerce Payments, you have a choice between two different ways to sell subscriptions:
- Built-in subscription functionality; or
- WooCommerce Subscriptions extension.
To learn more about these options, and which is best for your store, read over the subscription option comparison guide.
Transactions Linked to a Subscription
When looking at the Transactions page the subscription number will be listed next to any transactions that are linked to a subscription.
Go to Payments > Transactions:

Similarly, when opening a particular transaction, the subscription number will be listed next to the order number:

Payment Method Changes
In order for a store manager to change the payment method linked to a subscription, head to WooCommerce > Subscriptions. Open the specific subscription that needs to be edited, and click on the pencil icon next to Billing:

An edit form will open up, where you can select from the customer’s saved payment methods:

Once you have selected the new credit card, click on Update to save changes on the subscription.
New checkout experience (Early Access) #
In WooCommerce Payments version 3.2.0+, we introduced a new checkout experience allowing shoppers to choose their own preferred payment method:

How to activate the new checkout experience?
If it’s not enabled yet, go to: WP Admin > Payments > Settings. Under Payments accept on checkout section, enable the new checkout experience by clicking Enable in your store button:

A new screen will appear where you can select a few additional payment methods available within your WooCommerce Payments account:

Payments accepted on checkout
After enabling the “New checkout experience” you can view the available payment methods. To enable or disable payment methods, toggle the corresponding checkboxes and click on “Save changes” at the bottom of the page.

How to disable the new checkout experience?
Go to: WP Admin > Payments > Settings. Under Payments accept on checkout section, click on the three dots, then click Disable:

Another screen will pop up asking you to confirm:

What if a payment method can’t be enabled?
Based on your WooCommerce Payment status, a certain payment method may not be available, and you’ll be asked to contact WooCommerce Support to enable the payment method you require. When contacting WooCommerce Support, please make sure to include the payment method name that you want to enable.

Translations (Localization) #
WooCommerce Payments comes localization-ready out of the box, with support for the following languages:
- English (Australia)
- English (Canada)
- English (New Zealand)
- English (United Kingdom)
- English (United States)
- French (Canada)
- French (France)
- German
- Italian
- Spanish (Spain)
Translations are provided by the teams over at translate.wordpress.com. Stable versions and development versions of WooCommerce Payments are translated there, and anyone can contribute.
When you install or update WooCommerce Payments, WordPress will look for a translation in your language and automatically download it.
Troubleshooting #
Error determining the connection status
In certain circumstances, like when restoring a site from backup, this error could be encountered under WooCommerce > Settings > Payments > WooCommerce Payments.
Should that be the case, the connection to WordPress.com needs to be reset. To reset the connection:
- Go to Jetpack > Dashboard
- Scroll down to the Connections section
- Click Manage site connection
- Click Disconnect
- Wait for disconnection to complete.
- Go to Payments.
- Click Set up to reestablish the connection.
The Jetpack plugin isn’t required to run WooCommerce Payments, however it’s needed in order to reset the connection.

WooCommerce Payments Safe Mode
Safe Mode helps to prevent issues in cases where duplicate sites are connected to the same WooCommerce Payments connection. You’ll know your site is in Safe Mode via clear notice. Read more on the WooCommerce Payments Safe Mode page.
Error retrieving deposits, Error retrieving deposits overview, Error retrieving disputes.
These errors are likely a result of the Jetpack connection. Go to Jetpack > Dashboard, scroll down to the Connection section, and disconnect the site from Jetpack. Once done, reestablish the connection there to resolve the error message.
The Jetpack plugin isn’t required to run WooCommerce Payments, however, it’s needed in order to reset the connection.
Error Amount must be at least $0.50
Our payments partner, Stripe, requires a minimum of goods value of at least $0.50. This minimum amount is to ensure that you don’t lose money on a charge because Stripe’s processing fee combines a small fixed amount and a percentage.
To resolve the error, please make sure that your product price is at least $0.50.


